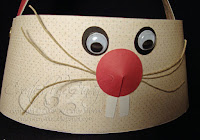
Ok, I can't help the bad pun...that's what we do in my family. Anyway, I finished this project last night and I was so happy with the way it turned out! Don't you just love it when a project comes together just the way you imagined it?! I think he's super cute, and he's big enough to set on a table filled with half a dozen eggs as a decoration, or you can give him to a friend or child on Easter morning. I just love the 3D facial features - the little pointy nose, googly eyes and "real" whiskers. The bottom is doubled, so it's fairly strong, but don't count on being able to carry him by his ears if you load him up too heavily.
I had the idea that I would coat the whole thing with Mod Podge to make him really strong, but I was too excited to share him to wait that long. I also planned to do a video tutorial to show you how to put him together, but we have a super big project going on at work, and when I got home tonight I was exhausted and had a headache, so the tutorial will have to wait until tomorrow. If you can't wait, I think you can figure it out with the photos.
The Basics: You'll need two pieces of heavy-weight double-sided (optional) card stock for the basket and ears, and scraps for the facial features and insides of the ears. I loved the clean, finished look it gave the inside by using a pretty double-sided cardstock. I used three 8" pieces of thin twine for the whiskers, knotted in the middle. The knot hides easily under the nose. You'll also need some really good white paper glue that dries clear for the reinforcement on the inside bottom piece and for the facial features. I used my ATG gun for most of the actual basket assembly. Use two regular brads for the handles - the size you get in the office supply store. You'll notice there are 2 ovals for the bottom of the basket. One is just slightly smaller and is to place on the inside bottom after you've attached the sides to the larger oval. The smaller piece covers the tabs on the inside and adds strength.
Jan, this one's especially for you and dedicated to your grandson. Maybe you can make one for him and give him some special Easter hugs and kisses for me!
Cartridge(s) Needed: George
Bunny Basket files for Design Studio
Bunny Basket files for Gypsy
Cricut kisses and crafty wishes!
Tuesday, February 23, 2010
Subscribe to:
Post Comments (Atom)
Blog Archive
-
▼
2010
(91)
- ► October 2010 (5)
- ► September 2010 (1)
- ► August 2010 (1)
- ► April 2010 (16)
- ► March 2010 (10)
-
▼
February 2010
(15)
- Bunny Basket tutorial now online - UPDATE for GYPS...
- Bunny Basket to make you "Hoppy"
- I've received a new award!
- Another AWESOME Tuesday Treat!
- Boutique Tissue Box Cover
- Your pictures in words...or making words with your...
- Word Art For Your Blogs and Scrapbooking
- Ask and you shall receive!
- Fifty is Nifty!
- And the winner is.....
- POP the COLOR in your PHOTOS for drama in blogs an...
- Matchbook Valentine - Quick and Easy!
- New tutorials planned??
- A birthday for me, BLOG CANDY for you!
- SCORE! Super Bowl Football Box
- ► January 2010 (24)
-
►
2009
(36)
- ► December 2009 (23)
- ► November 2009 (13)
About Me

- Cindy McVey
- Midlothian, Virginia, United States
- Lifetime crafter, beginning with sewing clothes for my troll dolls when I was 5. Stampin' Up! demonstrator since 2000. Wife of almost 30 years to my high school sweetheart and planning on 30 more! Mom to 2 great kids and one awesome new son-in-law. "Mom" to 3 furkids, Pomeranians Roxy and Lulu, and a Calico cat, Sugar aka "Miss Fattypants." Addicted to all things Disney!


19 comments:
OUUU! THANK YOU AND THANKS TO JAN'S GRANDSON!
Honestly, I love this guy and can't wait to make a couple for my mom (Nana to my nieces) ... she adores anything bunny!
OK ... gotta go find the perfect paper ... yay!
((hope your headache is better quickly, by the way))
THIS IS THE CUTEST EASTER BASKET.. THANKS FOR SHARING IT WITH US.
BOBBI
Cindy, This is the cutest bunny ever! I love it. I admire your creativity and talent. Thank you for sharing your hard work.
Wow! This is just to cute and adorable. Great job as always. Thank you for sharing your talent with us. Hope your headache goes away fast:)
Thank you! This blog post will be advertised on CraftCrave in the Cutting category today (look for timestamp: [24 Feb 01:00pm GMT]).
This is just the cutes project!!! I am trying to figure out who to make this for!!! TFS
OH MY GOD Cindy its beautiful, Dylan will love this...He is finally home and doing a little playing. I got to hold him and give him lots of hugs. He isen't 100% yet but will be soon.
Thank you Thank you
Jan
LOL I love this basket and the pun (but I love puns, see my Time Flies card on my blog). The details are marvelous with the bunny ears making the handle. TFS : )
Thank you so much for this Freebie. I want to let you know that I posted a link to your blog in Creative Busy Hands Cricut Freebies Search List, under the Elements post on Feb. 24, 2010. Thanks again.
Cindy he is so so cute! thank you for sharing him :))))
This came out great, Cindy. He is so cute and I think it would make a great coffeetable centerpiece. Your brain just doesn't stop does it?
this is the cutest project! thanks so much, cindy!
Cute project. I have visited your tutorial page and looked at each of them tonight. Although I have had Photo Shop Elements 7 for over a year, I just loaded it on my computer this week. The tutorials will be a tremendous help to me. I am definitely new to the digital scrapping experience but have been a traditional paper scrapper for years. Thanks so much for making the tutorials and I look forward to seeing more.
This is just the CUTEST basket ever! Now this one I'm going to have to try! It's adorable and I have so many terminally ill children I visit that to fill this up and give to them would just bring smiles to their faces. Thanks so much! You seem to just brighten my days!
P.S. Still working on my photo letters, but not making much progress -- don't understand some of the photo "lingo". But I always say, "nothing beats a failure but a try", so I'm going to keep trying -- LOL!
Awesome! Thanks for the cut file. I downloaded one for my GypsyGirl! :)
So cute..will have to look for good paper.
TFS
Margie
Adorable............Thank You So Much FS!
Just found your blog and I'm lovin' it! Cute bunny baskets. Thanks for sharing! Also, I read your profile - I have a Lulu and a Roxy too! Lulu is a 10 year old lab/great dane mix and Roxy, our newest member, is a border collie/lab mix. Tooo funny!
I made 7 of these baskets for Easter. I absolutely love them. Unfortunately, I only took a picture of one of them. I made a few slight changes. I didn't have any twine so I went old school and used pipe cleaners. It made the nose a little tougher but I think it worked out OK. I also used a very masculine paper for 2 and they looked great.
I don't know how to post the picture here so I'll post it over on the cricut MB. I'll be sure to list it as one of your designs.
Thank you for your wonderful designs.
Post a Comment